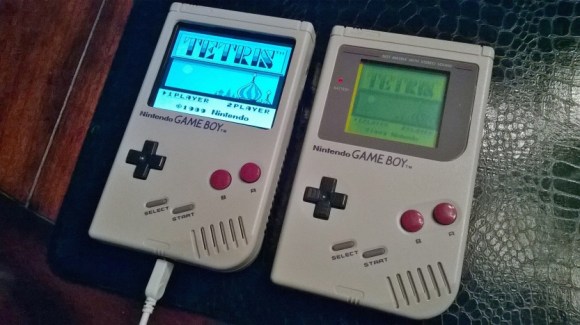
One day at Good Will, [microbyter] came across an original Gameboy for $5. Who reading this post wouldn’t jump on a deal like that? [microbyter] was a little disappointed when he got home and found out that this retro portable did not work. He tried to revive it but it was a lost cause. To turn lemons into lemonade, the Gameboy was gutted and rebuilt into a pretty amazing project.
Looking at the modified and unmodified units, it is extremely obvious that there is a new LCD screen. It measures 3.5″ on the diagonal and is way larger than the 2.6″ of the original screen. Plus, it can display colors unlike the monochrome original. Flipping the unit over will show a couple of buttons have been added to the battery compartment door to act as shoulder buttons.
The brains of the project is a Raspberry Pi running Retropie video game system emulation software which will emulate a bunch of consoles, including the original Gameboy. The video is sent to the LCD screen via the composite video output. The Pi’s headphone jack is connected to a small audio amplifier that powers the original speaker that still resides in the stock location. Connecting the controller buttons got a little more complicated since the original board was removed. Luckily there is a replacement board available for just this type of project that bolts into the stock location, allows the use of the original iconic buttons and has easily accessible solder points. This board is wired up to the Pi’s GPIO pins.

With all the above gear crammed into the Gameboy case, there was not enough room for a battery. The original headphone jack was removed and replaced with a micro USB port for connecting an external battery pack.
Thanks [John]
Filed under: nintendo gameboy hacks